Planting Trees and Shrubs (How-to)

Planting a tree is a long-term investment. Besides adding beauty to your landscape, a tree helps the environment by taking up carbon dioxide, the greenhouse gas that is such a big driver in climate change. It can provide shade to relax in on a hot summer day, as well as reduce the energy costs of cooling your home, or act as a windbreak to help cut winter fuel bills. And it can provide food and habitat for the creatures big and small that share your landscape. You’ll reap the biggest dividends if you take the time to get your young tree off to the best start by planting and caring for it correctly. Consider a well-grown tree a gift not only to yourself but to the generations to come who will enjoy it spreading branches.

Start by Finding the Trunk Flare

Tree roots need water, but they also need oxygen. The root system of a tree that is planted too deep will slowly suffocate. Too deep planting can also encourage the formation of circling roots will girdle or choke and kill the tree as it grows. So it’s very important to plant your new tree at the correct depth. The best way to do this is to make sure you find the trunk flare on your tree before you put it in the ground.

What do we mean by trunk flare? Start by looking at a tree that has grown naturally in the landscape. You’ll see that the base of the trunk gradually widens or flares out as it enters the ground. If you pull back some of the soil at the base of the tree, you’ll see the tops of the main order roots spreading out at this point. You want to plant your own tree so that the base of the trunk flare (also known as the root collar) is right at the surface of the soil (or slightly above in heavy soil). The flare of the trunk on a sapling is not as noticeable as it is on a mature tree, but if you look closely, you’ll see it — that is, if it’s not buried.

And there’s the problem. With both trees grown in containers and those sold with balled and burlapped (B & B) root balls, the trunk flare frequently gets buried in the course of digging or repotting. When the root balls of B & B trees are dug up, quite a bit of soil often gets thrown up around the base of the trunk before the ball gets wrapped in burlap. And when container-grown trees are repotted, they may end up with their trunk flares below soil level.

So forget the old advice to simply measure the height of the root ball to figure out how deep to dig the planting hole. If the trunk flare isn’t visible, find it by carefully pulling away the soil around the base of the trunk until you see the trunk flare.

Then dig the planting hole only as deep as the distance from the trunk flare to the bottom of the root ball. Why only this deep? Why not loosen the soil at the bottom of the hole before you set the tree in? Because you want to be sure the tree doesn’t sink down after planting. You need to set the root ball on undisturbed soil so that the ground below the ball won’t settle after you set it in the ground, causing the tree to end up planted too deep.

But first, before you begin digging your planting hole, check for underground utilities by calling. Also check for overhead obstacles such as electrical and phone lines. Remember – your tree will grow!

If it is bare root, soak overnight.

Make a Broad Planting Hole

As for the width of the hole, make it broad, at least two to three times the width of the root ball; as much as five times the width in compacted soil. Slope the sides of the planting hole outwards at a shallow angle (think of making a saucer, not a pit) and rough them up with the edge of your spade. This is especially important in clay soils where digging can leave the sides of the hole slicked over and hard for plant roots to penetrate.

Set the Tree in the Hole

With container-grown trees, slide the root ball out of its pot or cut it away if necessary. Loosen and spread out the roots on the outside of the rootball before setting it in the planting hole. With a B & B root ball, trim away the burlap and remove any twine. If the ball is in a wire basket, cut and fold back the wire from at least the top half of the ball; ideally you’d like to remove all the wire. This may be easier to do once the ball is in the hole. Basically, you’re trying to remove as much non-plant material as possible without causing the root ball to fall apart. If you notice any roots that are kinked or encircling the root ball, trim these away.

Check that the trunk flare is positioned so that it will emerge even with or slightly above the soil level when the planting hole is filled. Laying a long-handled tool like a garden rake across the span of the hole will help you figure where the soil level will be when the hole is filled in.

Be sure not to hold the tree by its trunk as you move it into the planting hole. And be careful not to drop the ball into the hole, as this can break off roots within the ball. If the root ball is heavy (and soil does weigh a lot!), try using a tarp under the ball to drag it carefully into the hole, using a plank of wood as a slide if needed.

Once the tree is in the hole, walk around and look at it from all directions and adjust it so that the trunk is straight, if necessary. It’s almost impossible to reposition a tree after you’ve filled the hole with soil!

Backfill with Native Soil

Now it’s time to backfill the planting hole with soil. Your first impulse may be to add lots of fertilizer and organic matter to the soil you put back in the hole. But stop! Your tree will do best if you use only the native soil to refill the hole. Why not improve this backfill soil? Because doing so will encourage roots to stay within the pocket of hospitable improved soil rather than crossing the boundary into the native soil to become established, which will ultimately interfere with the long-term health of the tree. And if you are planting in heavy soil and you fill the planting hole with lighter, more porous amended soil, the roots can drown as the hole fills up with water during rainy weather, just like a bathtub, with the water held in by the heavier soil outside the hole. So stick with the policy of what came out of the planting hole is all that goes back in.

Start by filling the hole about halfway with native soil, breaking up any large clumps with your shovel while taking care not to damage any tree roots. Then add 5-10 gallons of water to the hole and let it drain through, settling the soil to remove any air pockets. Add the remaining backfill, using the leftover soil to create a low berm around the edge of the planting hole to contain water. Firm the soil in the hole with your hands, not your feet, or you can compact the soil and restrict the growth of the roots. Then add another 5-10 gallons of water.

Stake only if Necessary

Staking is something else that most gardeners think is a must. But in many cases this is a task you can skip. Only stake your newly planted tree if necessary. Most trees with trunks smaller than two inches in diameter don’t need staking unless their root ball is crumbling; they are planted on a slope, are sited in a very windy location, or have a badly bowed trunk. The natural movement of an unstaked tree helps it to develop a sturdier trunk and a more robust root system.

If you do stake your tree, erect two stakes on opposite sides of the trunk. Attach flexible ties such as 3-inch wide nylon webbing straps on the lower half of the trunk and secure the ties to the stakes with heavy gauge wire. Stake loosely enough to allow some trunk movement; this is important for normal root and trunk development. Be sure to remove the stakes and ties as soon as the tree is established, usually after the first season of growth. Also remove any tags or trunk guards on the top of the tree at planting time. If you leave these on long-term, they may eventually girdle the tree as it grows, harming or even killing the tree.

Mulch Mindfully

Finally, spread mulch such as wood chips or shredded bark 2-4 inches deep over the root zone of the newly planted tree to help conserve soil moisture and keep weeds down. But don’t make a mulch ″volcano.″ Piling mulch up against the trunk can lead to rot and disease. Instead, leave about 6 inches of bare soil between the trunk and the mulch.

Give Follow-Up Care

Keep your young tree well-watered during its first season in the ground, but don’t overwater. The frequency of watering needed will depend on soil type, temperature, and rainfall, so check the soil moisture in both the rootball and the backfill a couple times a week. A houseplant moisture meter is a handy tool for this task. When you do water, add enough water to soak the entire depth of the rootball; don’t just wet the top few inches of soil with a light sprinkling. Then let the top 3 inches of soil dry out before re-watering.

Plant Shrubs Properly Too!

These same basic techniques apply when you are planting shrubs as well. Multi-stemmed shrubs won’t have a distinct trunk flare like a tree trunk does. But you’ll want to place a shrub so that its crown (where the stems and roots come together) is right at the soil surface or slightly above it, with the rootball resting on undisturbed soil, and follow the same guidelines for width of the planting hole, backfilling, and mulching.

Breathe New Life into Your Patio or Front Door with a Group of Container Gardens

Plants in containers have small footprints but make a big, beautiful impression. They’re a welcome sight at a front door, bring life to a back patio, and can even serve as a lush centerpiece on an outdoor table. Flora Grubb, owner of the eponymous nursery in San Francisco, shares her tips on creating and caring for potted displays, from choosing striking plant combinations to keeping them hydrated and happy.

THREE’S A CHARM
Chose a trio of plants that are interesting on their own or if the pot is large try 6 or 9 plants.

EASY EVERGREENS


Housed in an all-weather pot, these hardy dwarf conifers — stately Chamaecyparis obtusa ‘Habari’, yellow-green Chamaecyparis pisifera ‘Filifera Aurea’, and light-green Cryptomeria japonica ‘Little Diamond’ — can withstand even freezing temperatures.

A grouping of pots is a focal point — a part of the landscape that you want to look good all the time. Here’s how to create a dazzling display.

CHOOSE A VESSEL
Select your pot first. It’s your investment, and you’ll have it even as plants come and go. Don’t be afraid to go big. Large pots make a statement, and most plants are happier in them in the long run. Plus, a small container will need more frequent watering. Also consider color, shape, and material (most ceramics, for example, can’t handle frost). And make sure it has at least one good hole for drainage.

PICK PLANTS
Go for varieties that will work with your conditions. Flowers are fleeting. Nurseries are full of an amazing array of colors and textures, but show restraint, not everything is beautiful together. build the rest of the pot around its colors and textures. Also think about how the light will hit them at home: Plants can look different in sun or shade. If your pots will be under a porch, for instance, move your picks to a shady spot to see how they look before buying.

HELP THEM THRIVE
Use organic potting soil like Miracle-Gro when planting. Top-dress containers with compost or more soil at least annually, and water thoroughly. To promote deep root growth, place a hose on a very slow trickle in the pot, and let the water be slowly absorbed until it starts running out the bottom. For lush and robust plants, pinches back new growth frequently too keep them from getting leggy. Every year, clear the drainage hole by tipping back the planter and poking through it with a screwdriver.

Old Farm Equipment for Home and Garden Decor

Old farm equipment adds a rustic touch to decor for the backyard, garden, front porch — or even inside, in moderation. Everything from wagon wheels to a wooden wheelbarrow may be repurposed into decor around the garden; in some cases, the old pieces can even do double duty, housing plant pots or serving as a chandelier, for instance.

From Garden to Garage

Antique farm equipment tends to be made of wood and metal, rusted and aged to display-worthy perfection over the years. An old two-person tree saw — the type with gnarly teeth, a long blade and a handle on each end — creates an interesting piece of wall art above the door on a garden shed or a garage, out of reach of children. An old pitchfork, shovel or sickle serve as rustic decor for the outside walls of the shed or garage; add large farm tools as you come across them for an eclectic, ever-changing display. Mount them with old spurs or rusted chain-link fence clasps attached to boards for added visual interest; the tool handles hang from the spurs or clasps.

Buried stock tank as a pond.

Large-Scale Looks

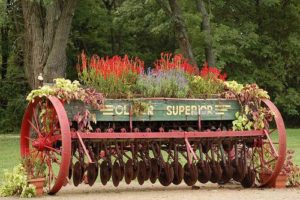
If you live on a large property with plenty of yard space, large-scale farm equipment provides a stunning sight, even from afar. Place a large antique tractor complete with metal wheels in a place visible from the road; leave it in rusty, rustic condition, or paint it bright red or a color true to its origins. Search the make and model of the tractor online, if known, to find out its probable original color if all the paint is gone. There is a beautiful example of this west of Winner, A wagon near the driveway provides a playful space for additional decor another example of that is on the way home tucked on a side road– in the autumn, stack bales of hay and a few pumpkins atop it; in the spring, jazz it up with an assortment of crocks or flowerpots filled with colorful plants and flowers.

Old seeder as a flower container.

Complete Circles

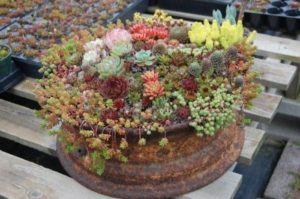
Circular wooden wagon wheels, huge metal tractor wheels and old grinding and sharpening stones add a soft touch to rustic decor with their round shapes. Lean a wagon wheel against a picket fence in a flowerbed, or against a lamppost or mailbox post. Use a huge metal tractor wheel as a centerpiece for a small flowerbed, allowing vines or roses to climb on it. Large grinding stones and sharpening stones add an organic look to an outdoor display — lean them against posts, like the wagon wheels, or use an assortment as unusual stepping stones for a path to the garden or backyard. I have an old stone mallet head I have on the garden path.

Close to Home

While you may not have space for large farm equipment indoors or on the porch, small- to medium-sized bits of farm gear add a rustic touch to your home. A wooden wagon wheel, fitted with a series of chains and small, open-topped tins, becomes an unusual chandelier for battery-operated tealight candles, or tealights dropped into deep glass votive holders. Punch holes in the tins in a pattern such as a star or crescent moon to allow the candlelight to shine through. Attach the chandelier to a beam on the ceiling of a tall porch, or from a sturdy beam indoors. A butter churn becomes a planter for ivy on the front porch; a wooden wheelbarrow holds seasonal potted plants for an ever-changing display of greenery, flowers or herbs.
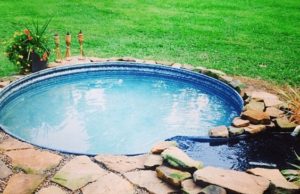
Old tire rim as a planting container

For more ideas go to our pinterest page:  https://www.pinterest.com/robertmoyer3194/using-old-farm-equipment-for-lawn-garden-design/