One in four Americans with two-car garages don’t have room to park their cars inside of them, according to the U.S. Department of Energy. The main reason? Clutter.
Your garage should be much more than a place to park cars: it’s a warehouse, a workshop, and even a sanctuary. Don’t let your rakes, toolboxes, or sporting equipment cramp your style. With a few garage makeover ideas, you can save space and transform your garage into the organized, flexible, and functional area you need.
Fold-down Workbenches
Rather than taking up space in your garage with an oversized, permanent work table, up your workspace game with a foldaway workbench.
Wall-mounted folding workbenches offer a place to work, wall storage to store your bench and tools out of the way, and easy collapsible access when it’s time to tackle your next project. Foldaway workbenches are available for purchase at hardwood stores and can also be easily completed as a DIY project.
Magnetic Steel Panels
To work safely and efficiently, it’s important to keep your tools in an accessible, organized space. While toolboxes offer secure storage, being able to conveniently grab (and find) what you need is much easier said than done.
Magnetic storage panels let you openly display your tools on the wall, while also implementing the ultimate space-saving organization rack. The tools are neatly displayed, out of the way and easy to retrieve (not to mention, extremely affordable).
Commonly used for kitchen knife storage, these magnetic steel panels can be found at your nearest hardware store. If you’re looking for something stronger, Walmart offers a 12-inch magnetic tool panel that’s strong enough to securely hold a five-pound cast-iron mallet. Simply hang the panel with a mounting bracket and store your essentials.
Ceiling Hooks
Finding space for bikes can be a constant struggle, but don’t settle for leaning them up against your garage wall. We all have unused space towards the ceiling. Why not put it to use? Bike racks can cost anywhere from $200-$600, while simple ceiling hooks are extremely affordable and easy to implement.
Here’s what you need:
Purchase heavy-duty, rubber-coated hooks from your local hardware store — they run for about $2 each.
Use a power drill to make holes from the garage ceiling for each hook to twist into.
Hang each bike by one of its wheels so it hangs vertically.
Garden Tool Holder
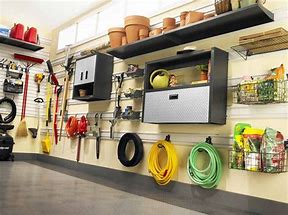
Does your garage double as a gardening shed? If you’re stocked up on shovels, rakes, brooms and more, chances are at some point, they’ve found a tangled home in the corner of your garage. Andy Bell, founder of Handyman Matters, suggests utilizing wall space to easily organize these essential tools with one simple product: a hose.
Have an extra hose laying around? Cut small pieces — around 7 inches or so — and slit each one down the front with scissors. Nail these vertically on the wall, with the opening facing forward. These make the perfect size holders for lawn and gardening tools and will save your garage floor from clutter.
Overhead Storage Shelves
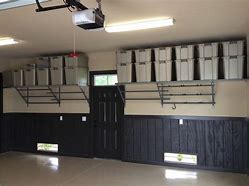
Whether you have storage boxes, totes, or crates sprawled on the garage floor, free up space by taking advantage of the ceiling.
Overhead shelves are ideal for infrequently used belongings like large crates, decorations and clothing. Sturdy ceiling-mounted storage units can even hold up to 600 pounds. These range anywhere from $20 to $500, depending how much storage and strength you’re looking for.
Overhead storage tip: If you need to be able to access these tools frequently, consider an overhead hoist pulley system which gives you easy access to boxes, kayaks, equipment and tools with the pull of a rope.
Bungee cord wall storage
If you have kids involved with sports, you know what it’s like trying to keep your sporting equipment in order. Instead of storing sporting goods in large bins (or scattered throughout the floor), create a bungee storage system on the wall to save tons of floor space.
You’ll need: bungee cords, nails and spare wood. Install three pieces of wood (making a “U” shape) to the top and bottom areas of wall that are the distance of your desired storage height. Hook four or five bungee cords from the wooden ledges, creating a barrier that keeps the balls in place.
Since the cords are flexible, you’ll be able to easily access footballs, basketballs, soccer balls — the whole nine yards. You can also buy a metal version online for about $20.
Shiny, water-resistant epoxy floors
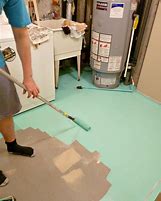
Now you see the floor: finish it off with a shiny epoxy floor coating. Epoxy resists chips, oil and grease stains, beads water and wipes clean like a kitchen counter.
Epoxy paints consist of a two-part application system follows by a sealing topcoat. Here’s the process:
Patch old potholes and cracks on your current garage floor.
Sweep and mop the surface with all-purpose cleaner, and rinse with clean water until dry .
Stir the epoxy paint until all ingredients are mixed. Pour the smaller can of hardener into the epoxy paint and stir together.
Fill a paint tray with epoxy paint. Brush the coating around the perimeter of the floor and spread evenly until the paint is smooth.
Let dry for 24 hours and apply a second coat.
Mix your topcoat with the hardener and stir until thoroughly blended. Wait 30 minutes and apply the top coat. Wait at least 72 hours to utilize your garage floor.
You can find epoxy paint at your nearest hardware store for around $30 per gallon, depending on the brand.
With a few simple but effective garage makeover ideas, you’ll turn your chaotic garage space into an open, organized and functional area. There are interlocking mats used for garage floor that are nonstick.
And do not forget the front door of the garage.
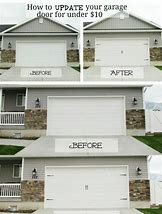
A can of paint and painter’s tape and few budget-friendly materials are all you need to give your tired garage door a modern makeover. Try putting in some fancy outdoor lights on both sides of the door to add appeal and functionality. Maybe a trellis over the top and sides with clematis growing up.
 Smoke bush
 Sunburst Honey Locust