The Great Fire Pit

A great fire pit or a fireplace is an excellent catalyst for good conversation, an excuse to relax outdoors away from technology, or enjoy the beauty that exists in your own backyard.

When considering making the addition of a fire pit or place, there are several things to consider:

Budget
There’s a wide range of options when it comes to selecting the perfect fire pit or fire place for your backyard.

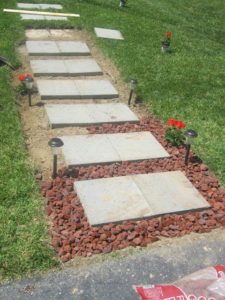
A fire pit using electrical lights

Location
Laying out your ideal backyard takes intentionality. A well thought-out yard is key to achieving that natural seamless feeling of space. Before deciding upon where you would like to put a fire pit or fireplace, you should visualize and plan the entirety of your yard to maximize the use of your property.

Wood/Gas
Another item to consider is if you want a wood or gas burning fireplace or pit. This decision will drive other necessary components (like gas lines or wood piles) to ensure a smooth running and usable space. Keep in mind, many cities in South Dakota have “No Burn Days” which mean wood burning fireplaces or fire pits are not allowed. You can use a LP fireplace or fire pit. Do not place it under trees or nest to the house or buildings, always consider SAFETY.

Ambiance
Lastly, to maximize the atmosphere that a fire can bring to any event, other elements such as seating need to be taken into consideration. A cozy built-in seating area or a sunken bench nestled next to a designated fire area can help provide the right environment for snuggling up and enjoying the relaxing warmth available from this amenity.

How To Build A Fire Pit

Step 1. Start With The Base

Now, lay down the curved blocks (retaining blocks) on the ground and piece together to make a circle. Mark three inches from the concrete base or outline with a pointed shovel. Hold the shovel down and dig all the way around the ring to make an outline.

Step 2. Dig A Hole

Next is to get the blocks out of the way so we can dig a hole in the outline. If you are building your fire pit over your grass lawn, you might want to save it, so you can patch the area around the fire pit. Using a square shovel, slide it underneath the grass and save as much as you can of it. Now dig a hole a foot deep into the ground and tamp it up a bit. If your soil is a hard clay, you can dig another hole in the center, so rainwater can drain through. Fill it with crushed stones for drainage.

Step 3. Form Foundation

Pour over the crushed stones in the hole and spread it evenly to about an inch or two thick. Take the hand tamper to pack and level it down. Lay another layer of crushed rocks of the same thickness and repeat the process. This will allow you to properly tamp and level the crushed rocks. Want more homesteading tricks, tips and tidbits? Click here to sign up NOW! We'll even throw in some FREE Survival Seeds Playing Cards!Repeat the process until you’ve reached the level of about four inches to the surface. Take in mind that the first layer of blocks is going to sit in level with the grass.

Step 4. Stack Blocks

Take your steel fire-pit ring with cooking grates and place it in the middle of the foundation as a guide to set the blocks around. Take the precast blocks and start leveling them out around the ring. Lay your first block and set it tight against the ring. Use the rubber mallet and tap the block down to set. Use a leveling tool to make sure the structure will be leveled. Set the other blocks tight around the ring following the same steps.

Step 5. Add Layers

With the first level of blocks set, take out the ring so you can work on the rest of the levels. Take out your caulk gun and concrete adhesive and apply a small amount of it on either side of block’s joint. Set another brick on top of the first layer making sure it sits centered on the joint. Continue with the rest of the blocks and add two more layers.

Step 6. Add The Fire Pit Ring

Get the steel fire pit ring and place it over the fire pit. Pour crushed rocks over the pit, filling it up to the baseline of the steel ring. The rocks will protect the base blocks from the heat of the fire. Use your shovel to rake the rocks to the sides so that it has a low spot in the center for making fire. Lastly, take some of the soil you’ve dug from the pit and fill the sides around the pit. You can also take the grass strips and replace it around the firepit.

There you have it! An easy and budget-friendly fire pit your family can spend time around. Waste no time testing your finished fire pit and plan a cookout under the stars!

Farm Equipment for the Rustic Touch

Old farm equipment adds a rustic touch to decor for the backyard, garden, front porch — or even inside, in moderation. Everything from wagon wheels to a wooden wheelbarrow may be repurposed into decor around the garden; in some cases, the old pieces can even do double duty, housing plant pots or serving as a chandelier, for instance.

From Garden to Garage
Antique farm equipment tends to be made of wood and metal, rusted and aged to display-worthy perfection over the years. An old two-person tree saw — the type with gnarly teeth, a long blade and a handle on each end — creates an interesting piece of wall art above the door on a garden shed or a garage, out of reach of children. An old pitchfork, shovel or sickle serve as rustic decor for the outside walls of the shed or garage; add large farm tools as you come across them for an eclectic, ever-changing display. Mount them with old spurs or rusted chain-link fence clasps attached to boards for added visual interest; the tool handles hang from the spurs or clasps.

Large-Scale Looks
If you live on a large property with plenty of yard space, large-scale farm equipment provides a stunning sight, even from afar. Place a large antique tractor complete with metal wheels in a place visible from the road; leave it in rusty, rustic condition, or paint it bright red or a color true to its origins. Search the make and model of the tractor online, if known, to find out its probable original color if all the paint is gone. There is a beautiful example of this west of Winner, A wagon near the driveway provides a playful space for additional decor another example of that is on the way home tucked on a side road– in the autumn, stack bales of hay and a few pumpkins atop it; in the spring, jazz it up with an assortment of crocks or flowerpots filled with colorful plants and flowers.

Complete Circles
Circular wooden wagon wheels, huge metal tractor wheels and old grinding and sharpening stones add a soft touch to rustic decor with their round shapes. Lean a wagon wheel against a picket fence in a flowerbed, or against a lamppost or mailbox post. Use a huge metal tractor wheel as a centerpiece for a small flowerbed, allowing vines or roses to climb on it. Large grinding stones and sharpening stones add an organic look to an outdoor display — lean them against posts, like the wagon wheels, or use an assortment as unusual stepping stones for a path to the garden or backyard. I have an old stone mallet head I have on the garden path.

Close to Home
While you may not have space for large farm equipment indoors or on the porch, small- to medium-sized bits of farm gear add a rustic touch to your home. A wooden wagon wheel, fitted with a series of chains and small, open-topped tins, becomes an unusual chandelier for battery-operated tealight candles, or tealights dropped into deep glass votive holders. Punch holes in the tins in a pattern such as a star or crescent moon to allow the candlelight to shine through. Attach the chandelier to a beam on the ceiling of a tall porch, or from a sturdy beam indoors. A butter churn becomes a planter for ivy on the front porch; a wooden wheelbarrow holds seasonal potted plants for an ever-changing display of greenery, flowers or herbs.

I have seen old stock tanks lined with plastic and used for beautiful fountains and ponds.

Deer-proof Garden

Readers have asked for advice on planting a deer-proof garden. In a word: plastic.

However, when it comes to real, living plants, “deer-proof” is not a realizable goal. The best we can hope for is to come up with a list of deer-resistant plants. In general, these are plants that deer don’t like well enough to eat all of, or plants that grow faster than the deer can eat them.
Over the years, I’ve seen lists of plants that deer love and plants that deer hate, and I have been fascinated to notice some of the same plants on both sides. It seems that deer in one area eat things that deer elsewhere don’t.

They also can change their habits. For many years, deer in my yard ignored my garden, but last year ate tomatoes and cucumbers down to the ground. I now have deer that browse the new growth on ivy, which I’ve never seen before. On one notable occasion, a deer ate the better part of a large, extremely toxic angel trumpet, yet I found no dead Bambi in the driveway.

Voracious and charming, greedy and beautiful, deer can be the bane or the grace of the garden. Although young deer will eat pretty much anything, mature deer are more discriminating.

Though there really is no such thing as a deer-proof plant, there definitely are deer-resistant ones. Often these are plants with hairy, smelly, waxy, dense or highly textured foliage. I have quite a lot of experience with deer, having been blessed with many of them in each of my gardens. At present, my yard hosts a clutch of young bucks in the lower back yard which are mainly cattails.
They come out of the cattails and go to the alfalfa across my driveway and occasionally come up to the yard of the house. They seem to be not afraid of the dogs at all.

Here are some of the more resistant plants:

Bulbs
Allium (ornamental onions), Begonia (tuberous begonia), Crocosmia, dahlia, Endymion (Spanish bluebells), freesia, Galanthus (snowdrops), gladiolus, hyacinths, daffodils, Scilla (squill), Polianthes (tuberose).

Shrubs and sub-shrubs
Abelia, Berberis (barberry), Brugmansia (angels trumpet), Buxus (boxwood), cotoneaster, daphne, Datura, Hypericum (St. John’s wort), juniper, lavender, spruce, Pieris (lily-of-the-valley shrub), pine, Potentilla (cinquefoil), laurel, Rhus (sumac), Ribes (flowering currant), rosemary, sage, spirea, lilac, viburnum, and ironwood.
Perennials
Aconitum (monkshood), yarrow, Agastache (hummingbird plant), Alyssum (basket-of-gold), Artemisia, aster, Aubrieta (rockcress), Bergenia (leatherleaf), chrysanthemum, Crambe (sea kale), Digitalis (foxglove), Echinacea (coneflower), Erigeron (fleabane), Eryngium (sea holly), Euphorbia (spurge), fennel, ferns (all), Gaillardia (blanket flower), geranium, hellebore, iris, Kniphofia (poker plant), Lavatera (mallow), lupine, Meconopsis (Welsh poppy), Monarda (bee balm), Nepeta (catmint), Oenothera (evening primrose), Papaver (poppies), Penstemon (beardtongue), Perovskia (Russian sage), Phlomis, Phormium (New Zealand flax), Pulmonaria (lungwort), rhubarb, Rudbeckia (black-eyed Susan), Santolina (lavender cotton), Scabiosa (pincushion flower), Stachys (lamb’s ear), thyme, Verbascum (mullein), verbena.
Annuals
Alyssum (sweet alyssum), Calendula (port marigold), Clarkia (farewell to spring), Cleome (spider flower), Eschscholzia (California poppy), heliotrope, lobelia, forget-me-not, nasturtium, Nicotiana (flowering tobacco), Papaver (poppies), Pelargonium (geranium), petunia, Ricinus (castor bean), marigold, verbena, zinnia.

Vegetables
Asparagus, rhubarb, potato, and lima beans.