Updating Your Home Might Be Cheaper Than You Think

Most of us have a nagging issue or two in our homes that we would like to fix. Perhaps your kitchen is just too dark to work in comfortably, or your bathroom is still living in the 1960s.

Good news: The update might be easier and less costly to make than you may think. Costs will vary depending upon where you live, and whether you can do all or some of the job yourself, but the average price of all the solutions below is around $1,000 or less.

  1. House is too cold or too hot

If your house is too cold in winter, or too hot if you live in a warm climate, here’s a solution that can help fix this issue dramatically: Add insulation to your attic or crawl space.

There are several types of insulation to choose from. Two of the most common types are fiberglass and cellulose. And then you can choose between rolled insulation, which is laid down on the attic floor, or blown-in insulation.

Regardless of what type of insulation you choose, and whether you choose to install it yourself or hire someone to do it, you can expect your house to be approximately 7-10 degrees warmer in the winter, and 7-10 degrees cooler in the summer, just from the attic insulation alone. That’s a noticeable difference!

As an added bonus, you can save up to several hundred dollars per year on your heating and cooling bills.

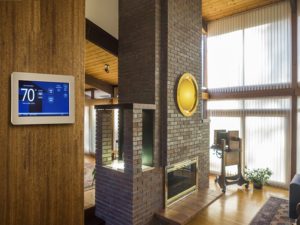
Adding insulation to your attic can help keep your home at a comfortable temperature year-round.
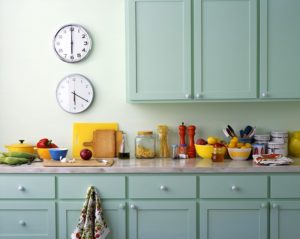
  1. Kitchen is too dark

The “fatal flaw” of many kitchens is simply not having enough light. Fortunately, you can find several possible lighting updates to install for well under $1,000.

For example, add a beautiful “focal point” pendant light to instantly make your kitchen better lit and more stylish. Or add can lights or track lighting in a working area of the kitchen.

Another option is under-cabinet lighting. It gives your kitchen a more modern feel and makes a great “night-lighting” option as well.

Depending on the size of your kitchen, and what styles of lights you choose, you can possibly install all three of these types of lights for around $1,000.

Combining pendant, can, and under-counter lighting provides the perfect mix to illuminate your kitchen.

  1. Kitchen cabinets are dated

Here’s another way to refresh the look of your kitchen for a modest investment. Update your kitchen cabinets by painting them a fresh new color. Then, swap out the old hardware for something more modern and striking.

You’ll find several brands of premium glossy paint on the market to give your cabinets a professional-looking finish, whether you hire someone to paint the cabinets for you or decide to tackle the job yourself. Visit a local paint store — rather than a hardware store — and ask the staff to recommend a brand and type of paint for your project.

Also, old, tarnished hardware can make your cabinets look older and more dated than they actually are. So, installing some bright, shiny handles and knobs can make a huge difference in the overall look of your kitchen.

A fresh coat of paint in a lively color can wake up a tired kitchen.

  1. Bathroom decor is out of style

Is your bathroom living in the past? Fortunately, you can find many ways to update your bathroom for a reasonable price, and most of these projects can be accomplished by a DIYer.

The changes you make really depend on what your bathroom needs. So, feel free to mix and match which updates work for you. Generally, you should be able to make several of the updates on the list below and keep your budget under $1,000.

Sample list of bathroom updates and materials cost

New vanity: $130-$300

Add tile backsplash above vanity: $6-$17 per square foot

New medicine cabinet with mirror: $50-$300

New toilet: $100-$300

New faucet: $50-$200

For a serene, modern look, stick to a neutral pallet, clean lines, and minimal embellishment.

  1. Front door is a bit dull

Nothing says “Welcome” to your home like a beautiful exterior, and your front door is the focal point. If yours is slightly lackluster, don’t worry about it! This fix gives big bang for your buck.

Option 1: Repaint the door. For a bare-bones update to a wood door, you can always repaint or restain it.

Option 2: Replace the door. Replacing a front door is a great option, and you can find a wide range of styles and types of doors to choose from. You can expect to pay between $600 and $1,000 for a new door, including professional installation.

A bright red door offers a perfect pop of color on a home’s exterior.


Just a simple update or two can make a big difference in how much you love and appreciate your home.

Starting Vegetables and Flowers Indoors

Growing seeds indoors isn’t hard; it’s keeping them alive that can be challenging. You can save a lot of money by growing seeds depending on how large your planting beds are, but only if they live and turn into robust plants. The main reason I start some plants is to get the varieties which you can not find elsewhere.

I have killed more seedlings than I care to admit. Armies of tiny seedlings have fallen under my care (or lack thereof). Avoiding these common mistakes will greatly increase your odds for success.

No matter what anyone tells you, chances are that you don’t have enough natural light in your house to grow robust seedlings because of the length of sunlight this time of year. Even a South facing window usually won’t do. Use artificial light. Either get some grow lights developed specifically for plants, or for a more economical solution, simply get some large fluorescent shop lights and put in one warm bulb and one cool. Hang the lights from chains so that you can raise them up as your seedlings grow. Keep the lights as close to the seedlings as possible without touching (2 to 3 inches). After your seedlings appear, you’ll want to keep the lights on for 12 to 16 hours a day. To make this easier, you can easily hook up a timer to turn your lights on and off automatically. If warm outside, I place them in a coldframe or plastic greenhouse and bring them inside when I get home if the temperature is cold.


Give your seedlings too much or too little water – either way, they are toast. This is perhaps the most challenging part of growing plants from seeds. Because seedlings are so delicate, there is very little room for error when it comes to watering. You want to keep your sterile, seed-starting medium damp, but not wet. I water from the bottom when the plants are tiny.

1.      Cover your container with plastic, until the seeds germinate

2.      Water from the bottom. By letting the plants soak up water through holes in their pots, there is less chance of overwatering

3.      Check your plants at least once a day

DO NOT START YOUR PLANTS TOO EARLY. Lots of plants don’t like the cold and exposing them to chilly air and soil will just stress them out and stressed out plants are more susceptible to pests and disease. Most plants are ready to go outside four to six weeks after you start the seeds. For our area the frost-free date is usually mid to end of May depending on the year.

Seeds are finicky when it comes to how deep they like to be planted. Some seeds need complete darkness to germinate and some like some light. This information is usually on the seed packet. If there isn’t any information, the rule of thumb is to plant seeds twice or three times as deep as they are wide. This can be a challenge to figure out, but if you’re not sure, err on the shallow side – don’t plant your seeds in too deep.

For seeds that need light to germinate, you’ll want to make sure that they are in contact with your seed starting medium, but not covered. To do this, first press the medium gently down to make a firm surface. Then place your seed on top of your medium and gently push down, making sure the seed is still exposed.

There is no benefit in a tough love approach to seedlings when they are young. If you try it, they just up and die or become weak and then fail to thrive. When plants are young, even the most stalwart need a huge amount of coddling and attention.

When your seedlings are ready to go outside, after all of this babying, the last thing you want to do is shove them out the door and into the harsh world without significant preparation. The process is called hardening off or, boot camp for plants.

The idea is to expose your plants to the elements gradually. Practically, this means that you put your seedlings outside for more time every day over the course of 6 to ten days, depending on your patience and the temperatures and the fragility of your seedlings. This prepares them slowly for the wind and sun. This is where a coldframe or cheap greenhouse works the best.

It certainly is easy to swoon over the gorgeous pictures and glowing descriptions found in the tons of seed catalogs that come flying through the ether and into our mailboxes every winter. This often gets me into trouble, causing me to buy many more seeds than I can start, much less nurture into adulthood. In fact, every year I bite off more than I can reasonably chew in the seed department and regret it. I am working on self-restraint in this area and suggest, particularly if you are a beginner, that starting modestly is the way to go. You can always do more direct planting in your beds when it gets warmer.

For seeds to germinate, most must be kept warm 65 to 75°F. A favorite place to do this is on top of the refrigerator. There are special “seedling mats” that you can buy to put under your seeds. You can also use a small heater put on a timer placed next to your seedlings. You will only need to worry about this until the seeds sprout. After that most can tolerate fluctuating temperatures (within reason). Also, and whatever type of light you use, natural or artificial should produce enough heat to keep them happy. I use the back bedroom as my plant room for the growing lights and the temperature stays on the cool side.

Every year I am determined to do clear, organized labeling of my seeds, but I often find things growing and don’t quite remember what they are or when exactly I planted them. I have had labels get lost or moved or they have become illegible from being watered. Here’s my advice. Get popsicle sticks and write the name of the seeds and the day you planted them in permanent ink. Stick it into the soil next to the seeds you’ve planted or label by row. 

When it comes to plant labeling, Sharpies are your friends. Also taking photos with your phone always is a good idea for keeping track of everything.

Starting seeds can be a real pain. It takes dedication, attention and time. That said you can’t beat eating a tomato that you have nurtured from day one. I would say that the biggest mistake in starting seeds would be to give up, even if you’ve made a few, or even a few hundred seed starting mistakes.

Items You Should Never Leave Out During a Home Showing

1. Your personal documents

Let’s start with the obvious, mostly because it needs repeating. Something that lists your full name and a bunch of numbers (e.g., your Social Security card, checkbook, or credit cards) is an identity thief’s dream haul.

Put them in another location like an office desk or a little safe.  Another place would be in an attic or basement because most people do not look into these areas much.  A wannabe criminal would never think of looking under your cat’s litter box, for instance. Gross.

2. Mail addressed in your name

What’s so wrong about leaving out your Dish or Verizon bill, still in a sealed envelope unless you want people googling your name and knowing all about you.

3. Space heaters, fans, and more

Some items that you use in your daily life might unwittingly give prospective buyers the wrong idea. (“Wrong” as in “You don’t want to live here.”)

Before your showing, hide the following things: a space heater (the house is too cold!); multiple fans (the house is too hot!); the baseball bat next to your bed (the neighborhood is sketchy!); and even those tiny foam earplugs next to your bed, which might suggest that your home is too loud at night. The same goes for an eye mask or books with telling titles such as “How to Survive Noisy Neighbors You Hate.”

4. An empty ashtray on your patio table

Cigarettes, even if not smoked inside, are a huge turnoff. The mere presence of even one ashtray (even an aesthetically pleasing one) on your backyard patio could send your deal up in smoke.

5. Your pet snake, noisy dog, or moody cat

Some people aren’t big on pets, so you might want to put them in an area where they are no running the house.  And don’t stop there. You should also pick up your pet’s dishes and toys.

6. Your ‘Make America Great’ or ‘I’m With Her’ sign

Even if it’s not proudly taped to your fridge, perhaps it’s halfway buried under other papers on your office desk and you have yet to file it away, it doesn’t matter. Buyers will zero in on political endorsements.

A simple campaign sign, no matter which side you are on, can turn off half your potential buyers. Keep your home neutral, and make it welcoming to individuals of every political persuasion to maximize your chances of a quick sale.